一、组件的嵌套
将所有的代码逻辑全部放到一个组件中,代码是非常的臃肿和难以维护的
并且在真实开发中,会有更多的内容和代码逻辑,对于扩展性和可维护性来说都是非常差的
所以,在真实的开发中,会对组件进行拆分,拆分成一个个功能的小组件
App.vue
1
2
3
4
5
6
7
8
9
10
11
12
13
14
15
16
17
18
19
| <template>
<div class="app">
<Header></Header>
<Main></Main>
</div>
</template>
<script>
// 导入组件
import Header from "./Header.vue";
import Main from "./Main.vue";
export default {
// 注册组件
components: { Header, Main },
};
</script>
<style lang="scss" scoped></style>
|
推荐两个 vscode 对于 vue 的插件
- vetur :高亮等
- Vue VSCode Snippets : 代码片段等
css 作用域
如果定义了父子组件
父组件中有一个 h2 标签且给了 css 样式
那么子组件也会有相应的样式
怎么解决?
子组件外边嵌套一个根元素。
二、父子组件通信
父组件传递给子组件:通过 props 属性
子组件传递给父组件:通过$emit 触发事件
父传子
Props 是你可以在组件上注册一些自定义的 attribute
父组件给这些 attribute 赋值,子组件通过 attribute 的名称获取到对应的值
Props 有两种常见的用法:
方式一:字符串数组
父组件 App,vue
1
2
3
4
5
6
7
8
9
10
11
12
13
14
15
16
17
18
19
20
21
22
23
24
25
| <template>
<div>
<show-message title="哈哈哈" content="我是哈哈哈"></show-message>
<show-message :n1Children="n1"></show-message>
<show-message :messageTitle="message.title"></show-message>
<show-message :messageTitle2="message"></show-message>
<show-message :="message"></show-message>
</div>
</template>
<script>
import ShowMessage from "./ShowMessage.vue";
export default {
data() {
return {
n1: "我是n1",
message: {
title: "我是message的title",
content: "我是message的content",
},
};
},
components: { ShowMessage },
};
</script>
|
子组件 ShowMessage.vue
1
2
3
4
5
6
7
8
9
10
11
12
13
14
15
| <template>
<div>
<h2>{{ title }}</h2>
<h4>{{ content }}</h4>
<h4>{{ n1Children }}</h4>
<h4>{{ messageTitle }}</h4>
<h4>{{ messageTitle2 }}</h4>
</div>
</template>
<script>
export default {
props: ["title", "content", "n1Children", "messageTitle", "messageTitle2"],
};
</script>
|
页面效果:
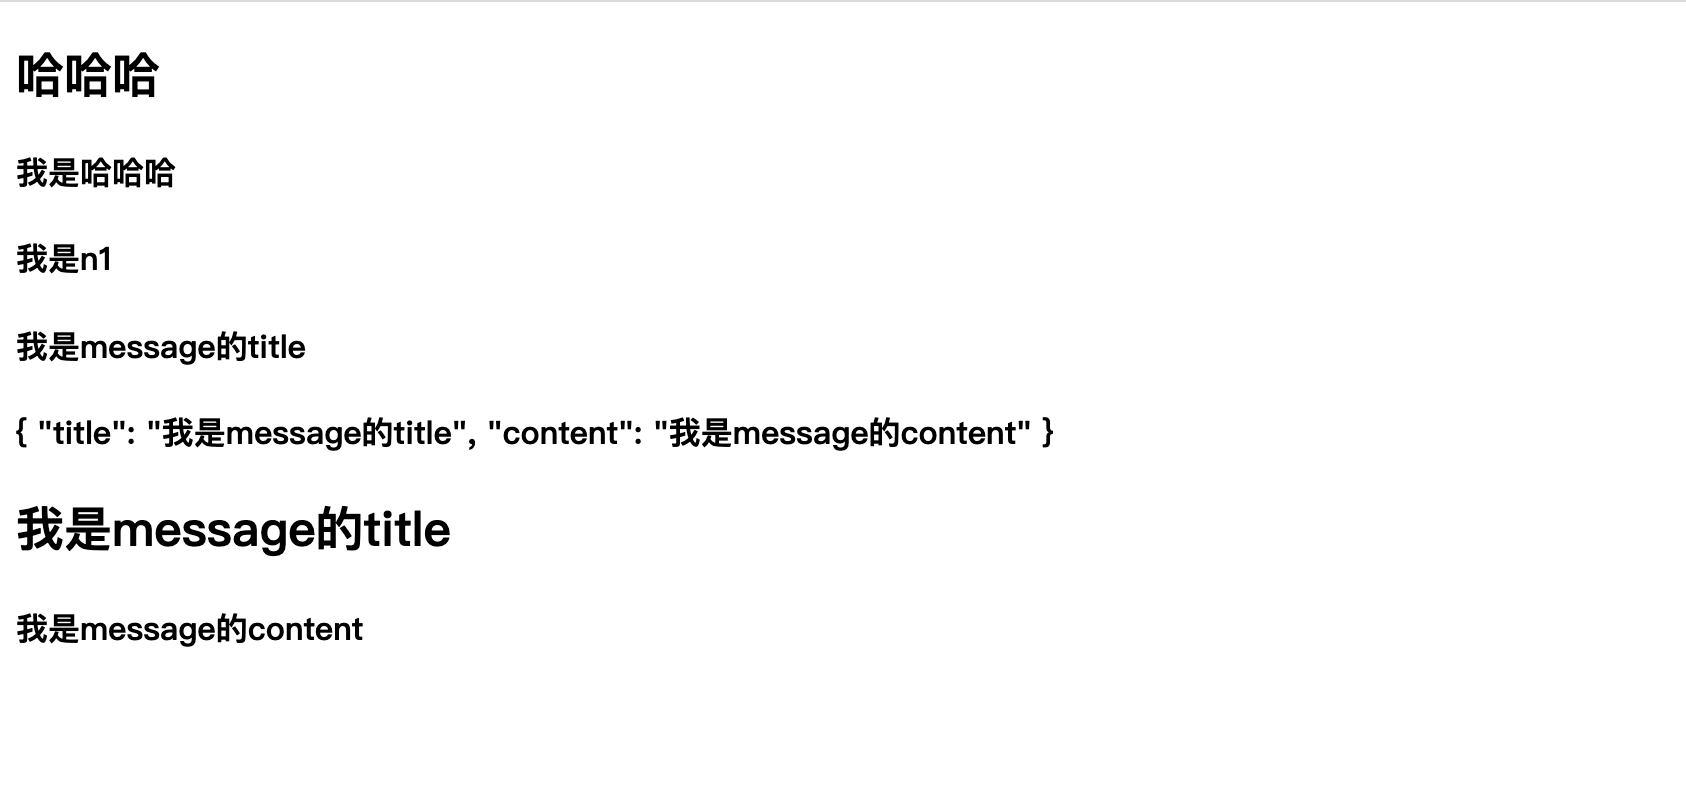
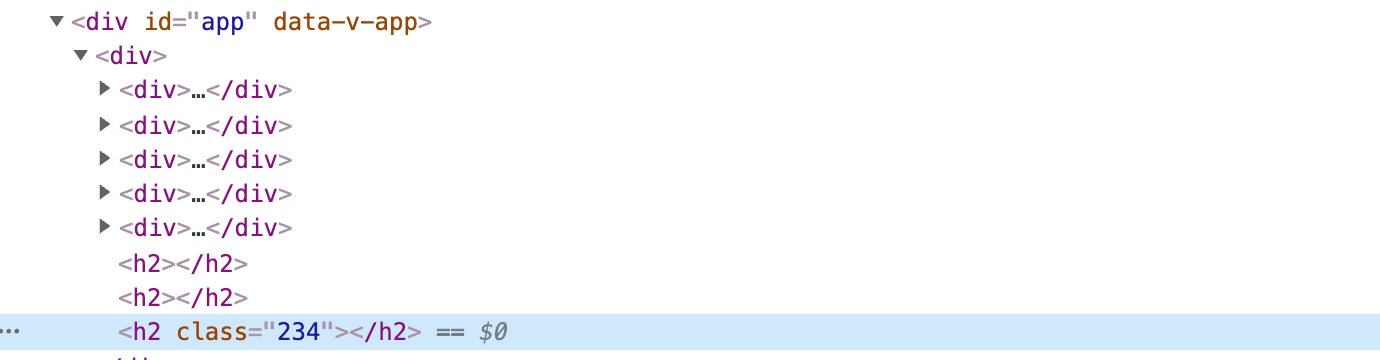
注意:<show-message :="message"></show-message>这种写法会自动进行 message 的解构赋值,也就是解构出来 title,content 属性进行渲染。
方式二:对象类型
- 对象类型我们可以在指定 attribute 名称的同时,指定它需要传递的类型、是否是必须的、 默认值等等
- 当使用对象语法的时候,我们可以对传入的内容限制更多
- 比如指定传入的 attribute 的类型
- 比如指定传入的 attribute 是否是必传的
- 比如指定没有传入时,attribute 的默认值
1
2
| props: { title: String, content: { type: Number, required: true, defaulr: 1223,
}, },
|
type 的类型都可以是哪些呢
String
Number
Boolean
Array
Object
Date
Function
Symbol
对象类型的其他写法
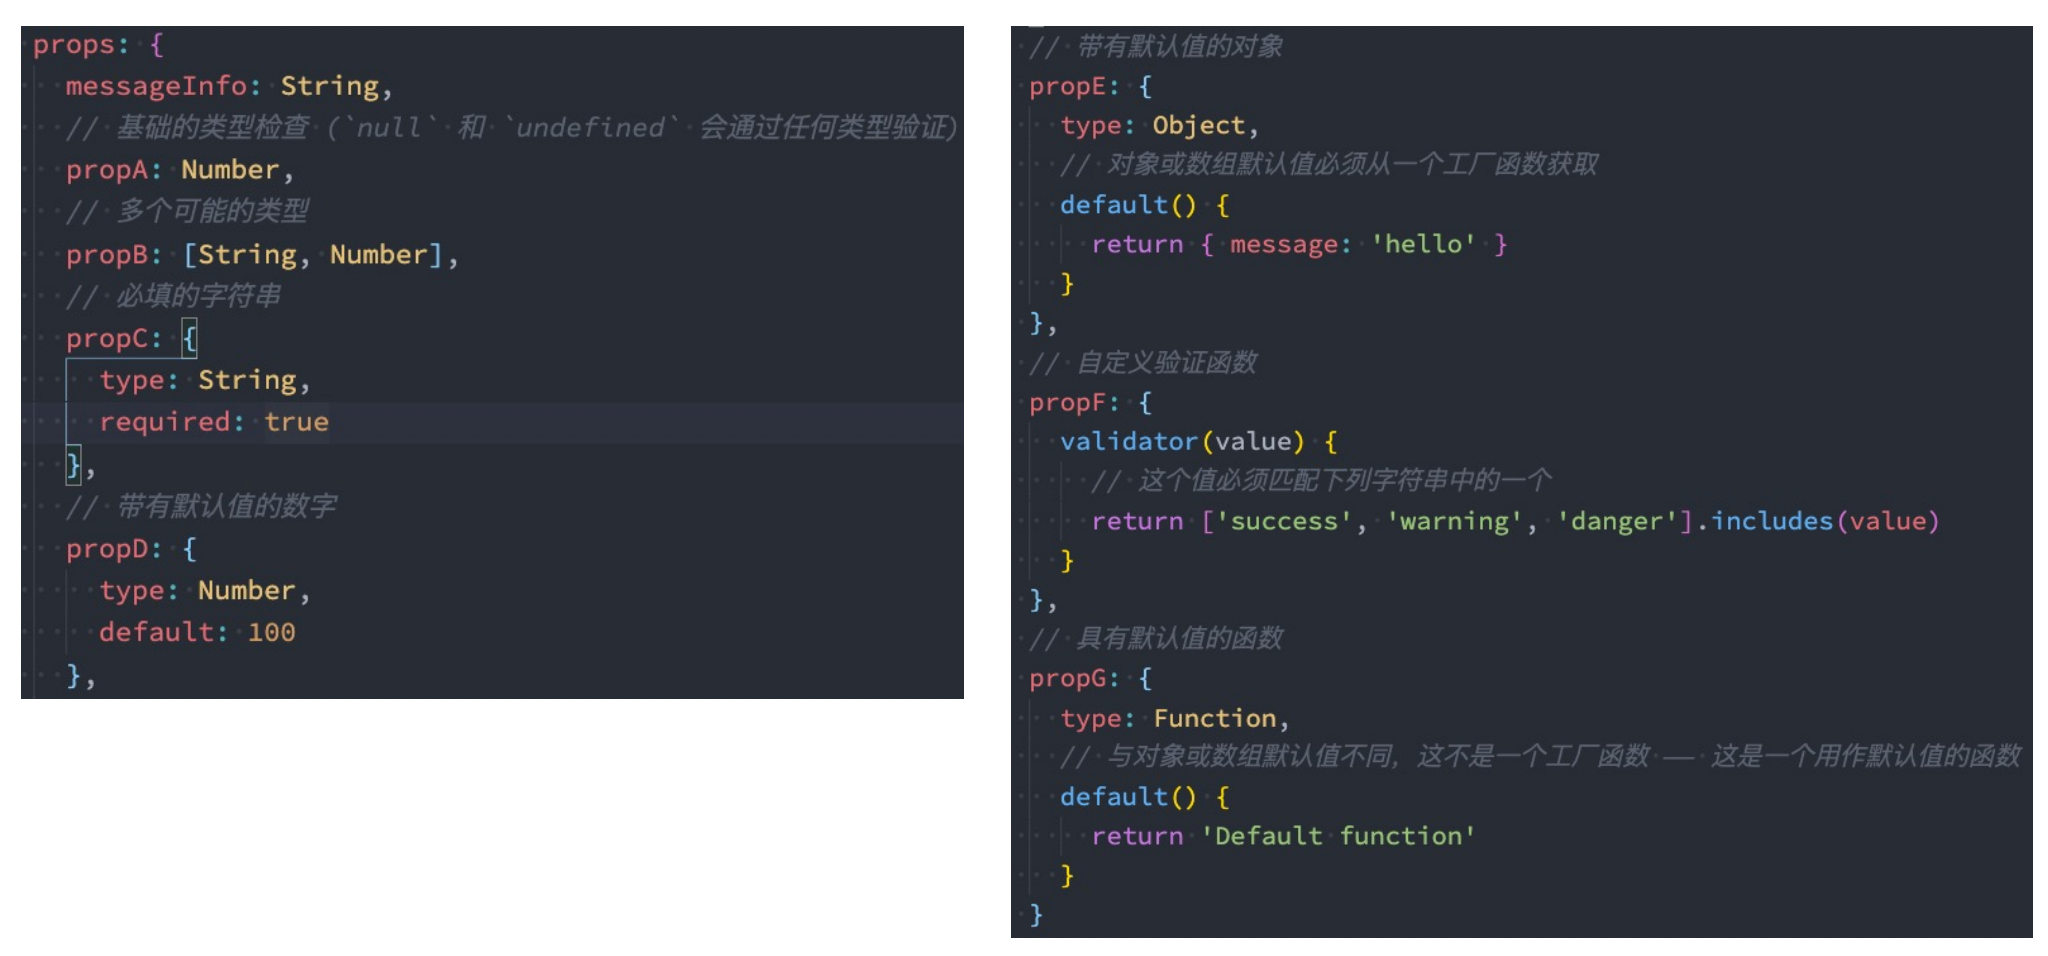
为什么对象或数组必须是一个函数?
Prop 的大小写命名
HTML 中的 attribute 名是大小写不敏感的,所以浏览器会把所有大写字符解释为小写字符比如 class CLASS 一样的
这意味着当使用 DOM 中的模板时,camelCase (驼峰命名法) 的 prop 名需要使用其等价的 kebab-case (短 横线分隔命名) 命名,
1
2
| <show-message messageTitle="1111"></show-message>
<show-message message-title="1111"></show-message>
|
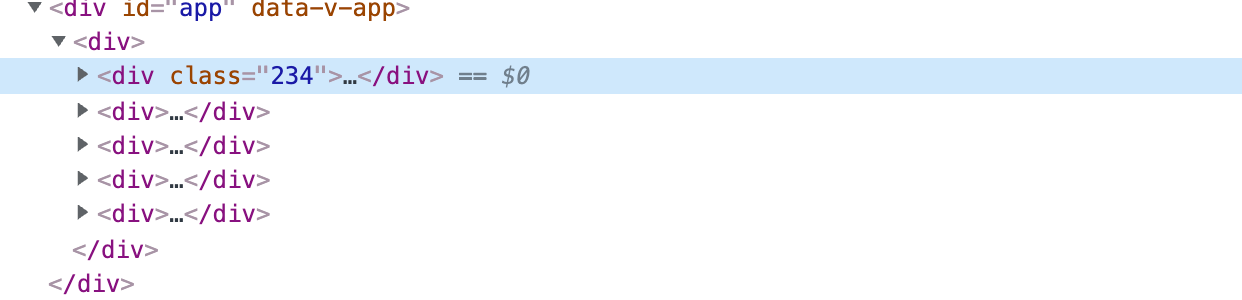
非 Prop 的 Attribute
当我们传递给一个组件某个属性,但是该属性并没有定义对应的 props 或者 emits 时,就称之为 非 Prop 的 Attribute
常见的包括 class、style、id 属性等
Attribute 继承
当组件有单个根节点时,非 Prop 的 Attribute 将自动添加到根节点的 Attribute 中
1
2
3
4
5
6
7
8
9
| <template>
<div>
<h2>{{ title }}</h2>
<h4>{{ content }}</h4>
<h4>{{ n1Children }}</h4>
<h4>{{ messageTitle }}</h4>
<h4>{{ messageTitle2 }}</h4>
</div>
</template>
|
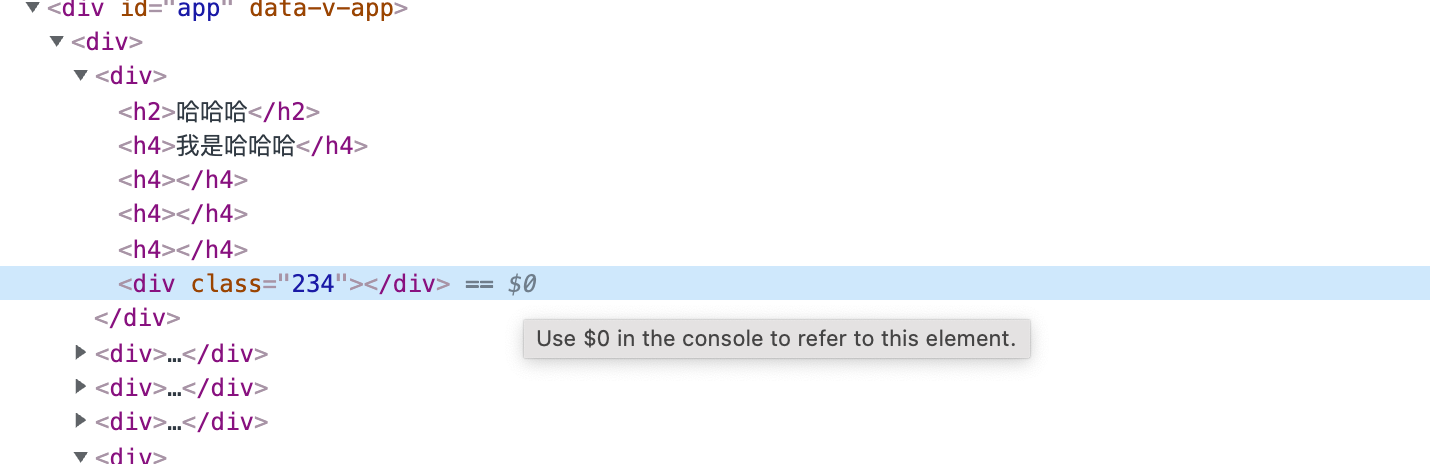
禁用 Attribute 继承和多根节点
如果不希望组件的根元素继承 attribute,可以在组件中设置 inheritAttrs: false
禁用 attribute 继承的常见情况是需要将 attribute 应用于根元素之外的其他元素
可以通过 $attrs 来访问所有的非 props 的 attribute
ShowMessage.vue
1
2
3
4
5
6
7
8
9
10
11
12
13
14
15
16
17
18
19
| <template>
<div>
<h2>{{ title }}</h2>
<h4>{{ content }}</h4>
<h4>{{ n1Children }}</h4>
<h4>{{ messageTitle }}</h4>
<h4>{{ messageTitle2 }}</h4>
<div :class="$attrs.class"></div>
</div>
</template>
<script>
export default {
inheritAttrs: false,
props: ["title", "content", "n1Children", "messageTitle", "messageTitle2"],
};
</script>
<style lang="scss" scoped></style>
|
多个根节点的 attribute
多个根节点的 attribute 如果没有显示的绑定,那么会报警告
必须手动的指定要绑定到哪一个属性上
1
2
3
4
5
| <template>
<h2></h2>
<h2></h2>
<h2 :class="$attrs.class"></h2>
</template>
|
子传父
什么情况下子组件需要传递内容到父组件
- 当子组件有一些事件发生的时候,比如在组件中发生了点击,父组件需要切换内容
- 子组件有一些内容想要传递给父组件的时候
如何完成
- 首先,我们需要在子组件中定义好在某些情况下触发的事件名称
1
2
3
4
5
6
7
8
9
10
11
| <div>
<button @click="increment">+ 1</button
><button @click="decrement">- 1</button>
<button @click="decrementN">+ N</button>
</div>
<script>
export default {
emits: ["add", "sub", "addN"],
};
</script>
|
- 其次,在父组件中以 v-on 的方式传入要监听的事件名称,并且绑定到对应的方法中
1
2
3
4
5
6
7
8
9
10
11
12
13
14
15
16
17
18
19
20
21
22
23
24
25
26
27
28
29
30
31
32
33
34
| <template>
<div>计数:{{ counter }}</div>
<counter-operation
@add="addCounter"
@sub="subCounter"
@addN="addCounterN"
></counter-operation>
</template>
<script>
import CounterOperation from "./CounterOperation.vue";
export default {
data() {
return {
counter: 0,
};
},
components: {
CounterOperation,
},
methods: {
addCounter() {
this.counter++;
},
subCounter() {
this.counter--;
},
addCounterN(num, name, age) {
console.log(num, name, age);
this.counter += num;
},
},
};
</script>
|
- 最后,在子组件中发生某个事件的时候,根据事件名称触发对应的事件,通过 this.$emit 的方式发出去事件
1
2
3
4
5
6
7
8
9
10
11
12
13
14
15
16
| <script>
export default {
emits: ["add", "sub", "addN"],
methods: {
increment() {
this.$emit("add");
},
decrement() {
this.$emit("sub");
},
decrementN(num) {
this.$emit("addN", 100, "xxx", 27);
},
},
};
</script>
|
vue3 当中,我们可以对传递的参数进行验证,一般使用对象写法
1
2
| // emit: ['add', 'sub','addN'], emits: { add: null, sub: null, addN: (num, name,
age) => { if (num > 10) { return true; } return false; }, },
|
案例练习
点击 tar 栏不同选项切换页面
App.vue
1
2
3
4
5
6
7
8
9
10
11
12
13
14
15
16
17
18
19
20
21
22
23
24
25
26
27
28
29
30
| <template>
<div>
<tar-control :titles="titles" @click="contentT"></tar-control>
<h4>{{ contents[currentIndex] }}</h4>
</div>
</template>
<script>
import TarControl from "./TarControl.vue";
export default {
data() {
return {
currentIndex: 0,
titles: ["衣服", "鞋子", "裤子"],
contents: ["衣服页面", "鞋子页面", "裤子页面"],
};
},
components: {
TarControl,
},
// 监听发射的事件后进行的操作
methods: {
contentT(index) {
this.currentIndex = index;
},
},
};
</script>
<style lang="scss" scoped></style>
|
TarControl.vue
1
2
3
4
5
6
7
8
9
10
11
12
13
14
15
16
17
18
19
20
21
22
23
24
25
26
27
28
29
30
31
32
33
34
35
36
37
38
39
40
41
42
43
44
45
46
47
48
49
50
51
52
53
54
| <template>
<div class="tar">
<template v-for="(title, index) in titles" :key="title">
<span
class="tar-item"
:class="{ active: currentIndex === index }"
@click="itemClick(index)"
@clilk="titleClick"
>{{ title }}</span
>
</template>
</div>
</template>
<script>
export default {
//定义发射事件名称
emits: ["click"],
data() {
return {
currentIndex: 0,
};
},
props: {
titles: {
type: Array,
default() {
return [];
},
},
},
methods: {
//修改下标 发射事件
itemClick(index) {
(this.currentIndex = index), this.$emit("click", index);
},
},
};
</script>
<style scoped>
.tar {
display: flex;
/* justify-content: center; */
text-align: center;
}
.tar-item {
flex: 1;
}
.tar-item.active {
color: blue;
border-bottom: 3px solid blue;
}
</style>
|
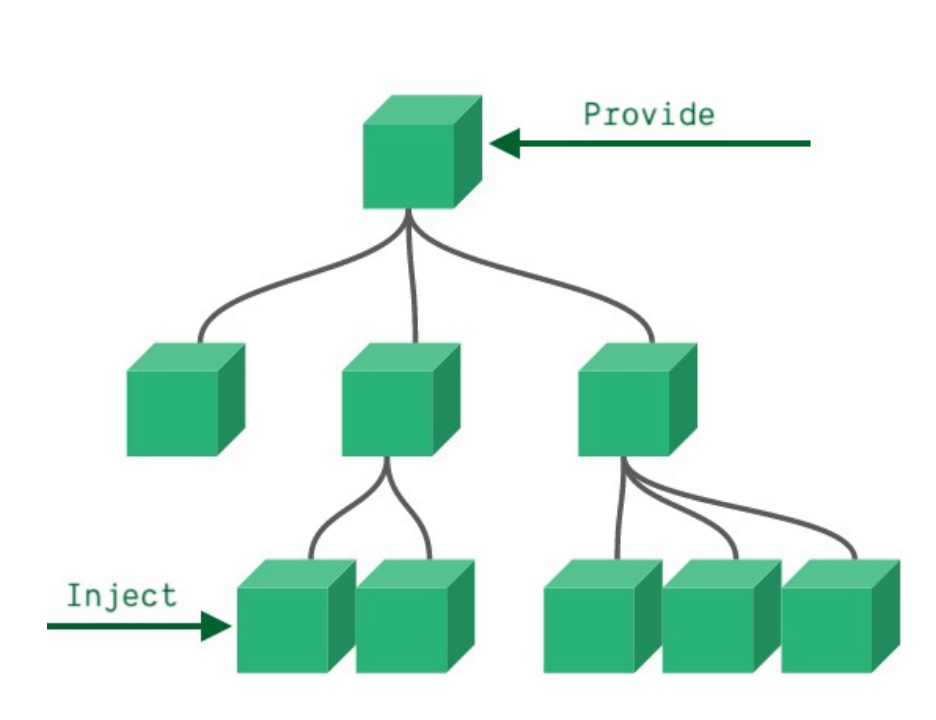
三、非父子组件通信
provide/inject
Provide/Inject 用于非父子组件之间共享数据
比如有一些深度嵌套的组件,子组件想要获取父组件的部分内容
在这种情况下,如果仍然将 props 沿着组件链逐级传递下去,就会非常的麻烦
对于这种情况下,可以使用 Provide 和 Inject
无论层级结构有多深,父组件都可以作为其所有子组件的依赖提供者
- 父组件有一个 provide 选项来提供数据
- 子组件有一个 inject 选项来开始使用这些数据
实际上,可以将依赖注入看作是“long range props”
- 父组件不需要知道哪些子组件使用它 provide 的 property
- 子组件不需要知道 inject 的 property 来自哪里
基本使用
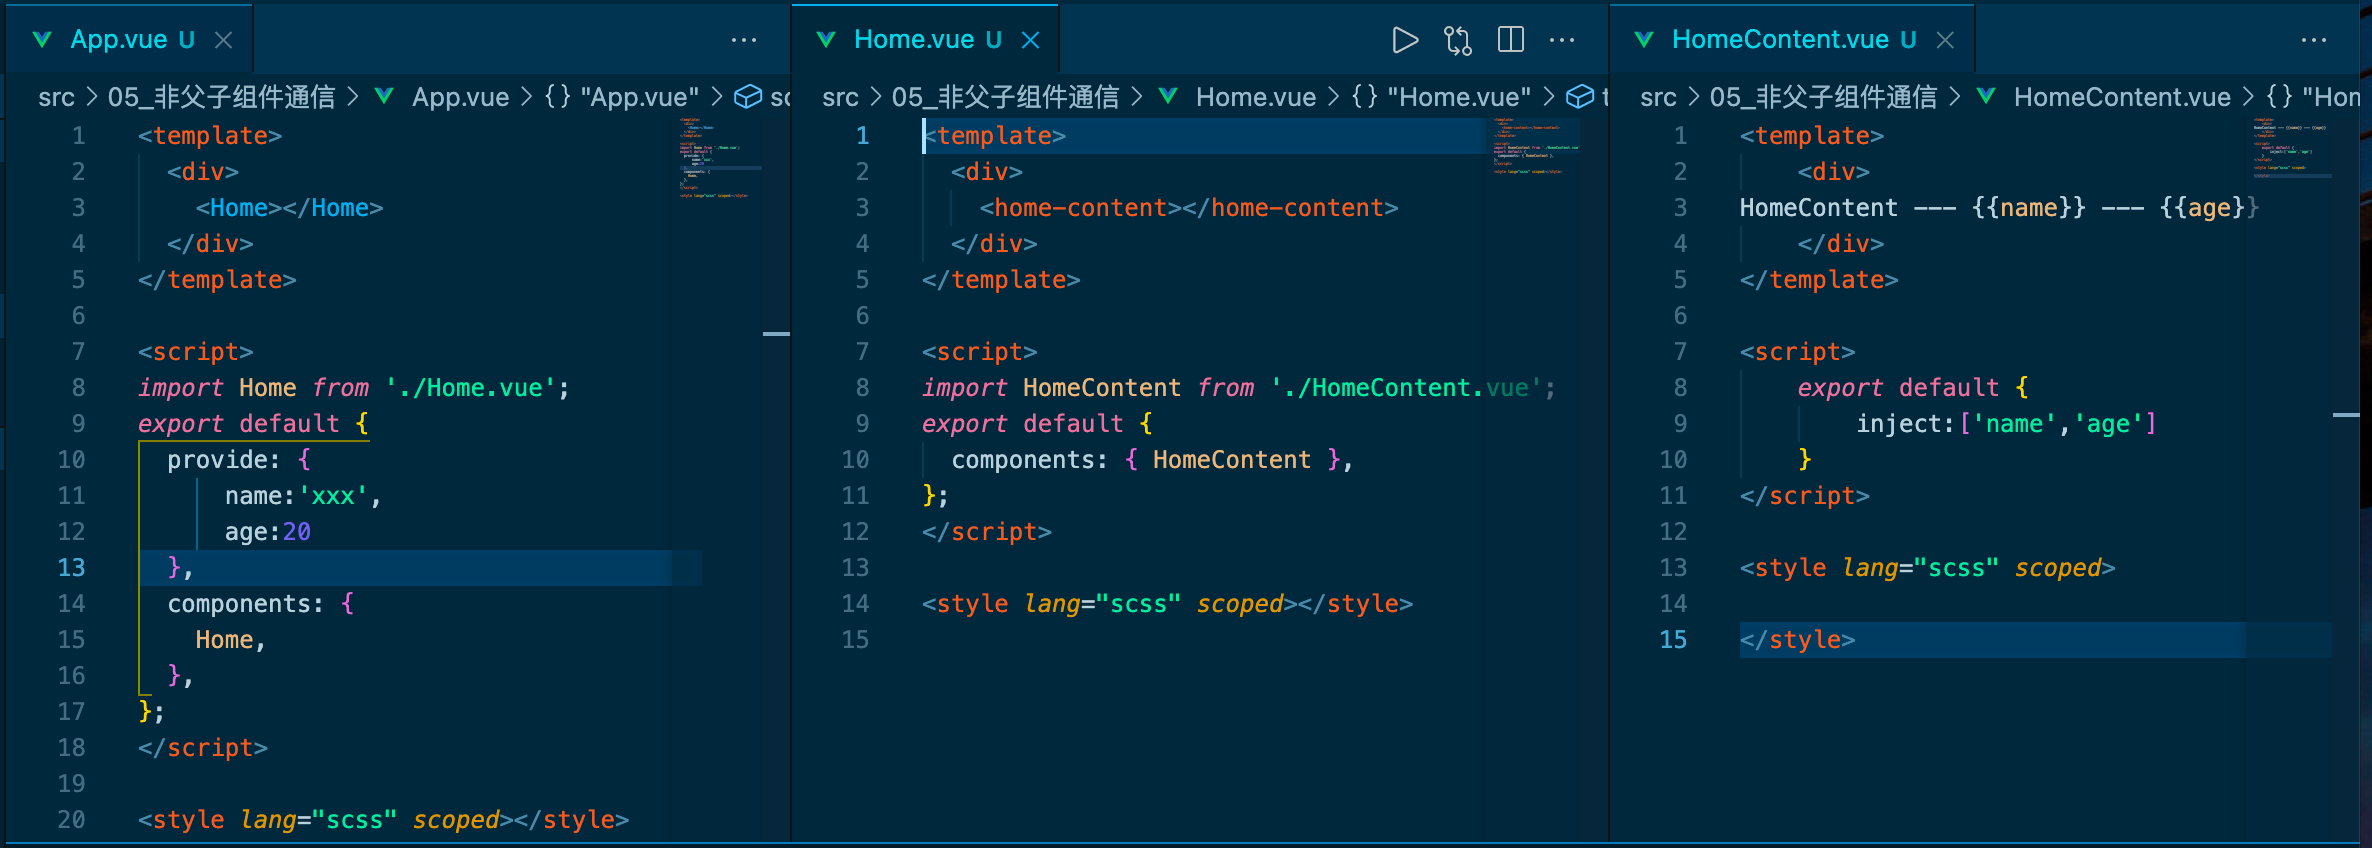
函数的写法
如果 Provide 中提供的一些数据是来自 data,那么我们可能会想要通过 this 来获取
这个时候会报错,因为这里的 this 指向的是上层作用域中的也就是 undefined
所以:
1
2
3
| export default { data() { return { names: ['xxx', 'rrr', 'ttt'], }; }, provide()
{ return { name: 'xxx', age: 20, length: this.names.length, }; }, components: {
Home, }, };
|
处理响应式数据
如果修改了 this.names 的内容,会发现对应的子组件中是没有反应的
这是因为当修改了 names 之后,之前在 provide 中引入的 this.names.length 本身并不是响应式的
那么怎么样可以让我们的数据变成响应式的呢?
- 可以使用响应式的一些 API 来完成这些功能,比如说 computed 函数
- computed 是 vue3 的新特性
注意:在使用 length 的时候需要获取其中的 value,这是因为 computed 返回的是一个 ref 对象,需要取出其中的 value 来使用
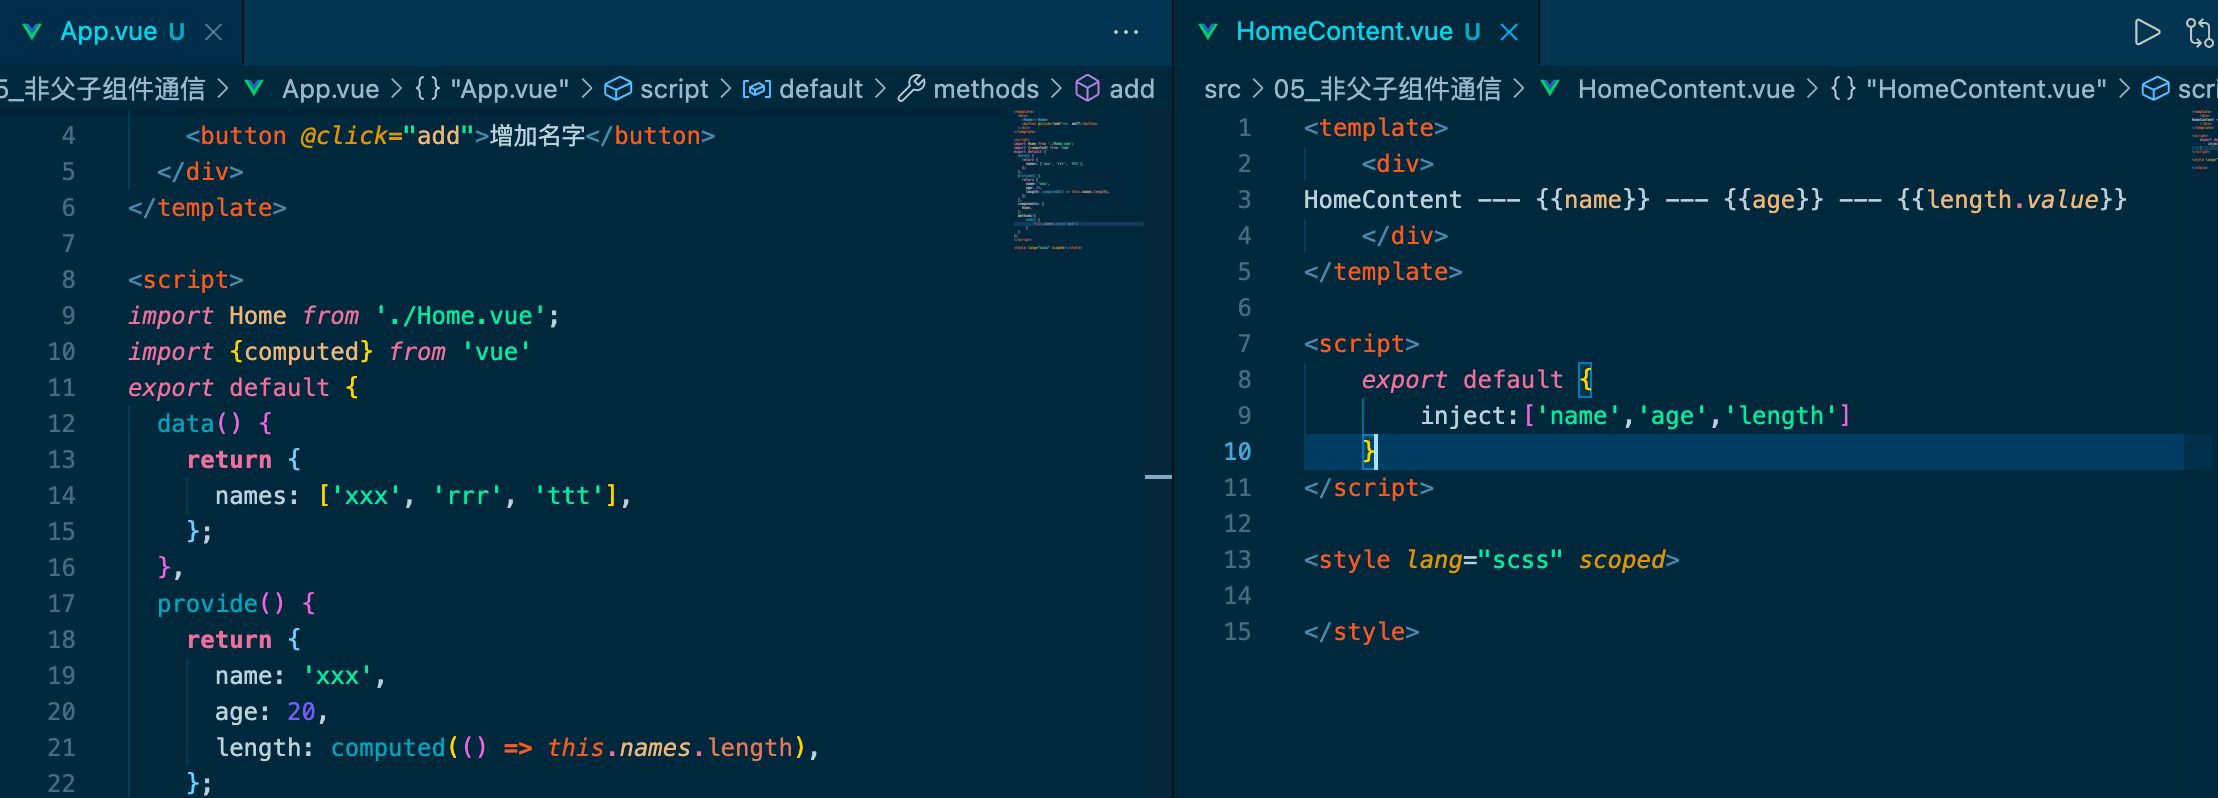
不过目前不需要.value 了,会自动转换 直接 length 就可以