一、案例引入react生命周期
理解
- 组件从创建到死亡它会经历一些特定的阶段。
- React组件中包含一系列钩子函数(生命周期回调函数), 会在特定的时刻调用。
- 我们在定义组件时,会在特定的生命周期回调函数中,做特定的工作。
引入案例
需求:定义组件实现以下功能:
- 让指定的文本做显示 / 隐藏的渐变动画
- 从完全可见,到彻底消失,耗时2S
- 点击“去死吧”按钮从界面中卸载组件
基本实现:
1
2
3
4
5
6
7
8
9
10
11
12
13
14
15
16
17
18
19
20
21
22
23
24
25
26
27
28
| <script type="text/babel">
//创建类式组件
class Life extends React.Component {
state = { opacity: 1 }
death = () => {
//卸载DOM,注意语法
ReactDOM.unmountComponentAtNode(document.getElementById('test'))
}
render() {
console.log(1);
setInterval(() => {
let { opacity } = this.state
opacity -= 0.1
if (opacity <= 0) opacity = 1
this.setState({ opacity })
}, 200)
return (
<div>
<h2 style={{opacity:this.state.opacity}}>React学不会啦</h2>
<button onClick={this.death}>死去吧</button>
</div>
)
}
}
//渲染组件到页面
ReactDOM.render(<Life />, document.getElementById('test'))
</script>
|
这样的定时器放到render函数里有个问题:
render函数在初次渲染页面时会调用一次,并且状态更新时会再次调用
第一次渲染页面render里新建了一个定时器
但是我们进行了state的状态更新this.setState({ opacity }),所以会再次调用rener
这样就出现了无限循环嵌套的bug,寄!。
怎么解决呢?
我们可以去新建一个按钮,点击按钮执行函数然后新建定时器,不放在render里不就解决了?
1
2
3
4
5
6
7
8
9
10
| action = () => {
setInterval(() => {
console.log(1);
let { opacity } = this.state
opacity -= 0.1
if (opacity <= 0) opacity = 1
this.setState({ opacity })
}, 200)
}
<button onClick={this.action}>开始更新</button>
|
是解决了 但是需要我们手动点击,怎么让他自动去执行呢? – 生命周期函数
1
2
3
4
5
6
7
8
9
10
11
12
13
14
| //组件挂在完调用
componentDidMount() {
setInterval(() => {
console.log(1);
let { opacity } = this.state
opacity -= 0.1
if (opacity <= 0) opacity = 1
this.setState({ opacity })
}, 200)
}
//组件将要卸载时调用 注意是将要
ComponentWillUnmount() {
}
|
这样就完美解决了,但是此时如果我卸载组件:

啥意思:因为我卸载了这个组件,但是定时器还存在,组件不存在状态也就没了,定时器里去修改状态还怎么修改呢,自然就报错了
怎么解决:卸载组件前清除定时器
可以在卸载函数里清除
1
2
3
4
5
6
7
8
9
10
11
12
13
14
15
| death = () => {
clearInterval(this.timer)
//卸载DOM,注意语法
ReactDOM.unmountComponentAtNode(document.getElementById('test'))
}
//组件挂在完调用
componentDidMount() {
this.timer = setInterval(() => {
console.log(1);
let { opacity } = this.state
opacity -= 0.1
if (opacity <= 0) opacity = 1
this.setState({ opacity })
}, 200)
}
|
当然,也可以放到生命周期函数里
1
2
3
4
| //组件将要卸载时调用 注意是将要
componentWillUnmount() {
clearInterval(this.timer)
}
|
完美解決。
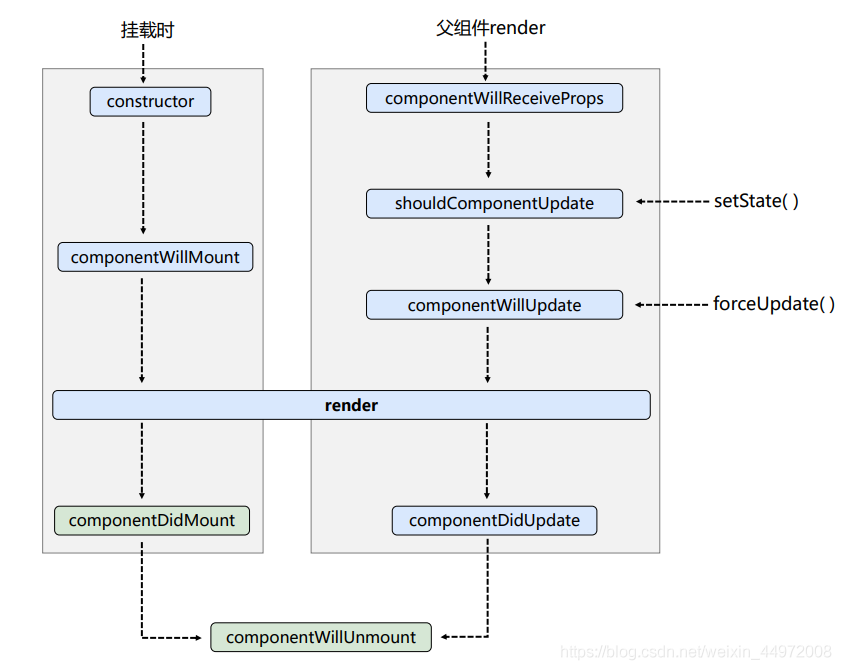
二、react生命周期(旧)
挂载时
首先调用 constructor()
其次调用将要挂载钩子 componentWillMount()
再调用render()
在调用挂载完成钩子 componentDidMount()
1
2
3
4
5
6
7
8
9
10
11
12
13
14
15
16
17
18
19
20
21
22
23
24
| constructor(props) {
console.log('Count --- constructor');
super(props)
this.state = { count: 0 }
}
//组件将要挂载的钩子
componentWillMount() {
console.log('Count --- componentWillMount');
}
//组件挂载完毕的钩子
componentDidMount() {
console.log('Count --- componentDidMount');
}
//初次渲染,状态更新时调用
render() {
console.log('Count --- render');
const count = this.state
return (
<div>
<h2>求和:{this.state.count}</h2>
<button onClick={this.add}>+1</button>
</div>
)
}
|
打印结果:

注意:生命周期钩子执行顺序不受我们写的顺序影响,特定的时间调用特定的钩子
更新时
正常更新时 setState()
- 正常更新时,会有一个钩子来判断是否允许更新
- 当我们不写这个钩子时,默认为true,也就是允许更新
- 当我们写了这个钩子,必须返回值,true为允许,false为不允许,若为false就不会进行后续的更新。
1
2
3
4
5
6
7
8
9
10
11
12
13
14
15
| //控制组件更新的阀门
shouldComponentUpdate() {
console.log('Count --- shouldComponentUpdate');
//不写这个钩子 默认返回true 写了这个钩子一定自己返回个值
//true代表允许更新,继续往下执行 false代表不允许更新,不会进行后续的操作
return true
}
//组件将要更新的钩子
componentWillUpdate() {
console.log('Count --- componentillUpdate');
}
//组件更新完毕的钩子
componentDidUpdate() {
console.log('Count --- componentDidUpdate');
}
|
当我点击+1按钮更新状态时,打印效果:

强制更新时 forceState()
- 强制更新会绕开shouldComponentUpdate()的判断,无论值为true还是fasle都会更新
1
2
3
4
| force = () => {
this.forceUpdate()
}
<button onClick={this.force}>不更改状态,强制更新</button>
|

此时我把shouldComponentUpdate()改为false
1
2
3
4
5
6
| shouldComponentUpdate() {
console.log('Count --- shouldComponentUpdate');
//不写这个钩子 默认返回true 写了这个钩子一定自己返回个值
//true代表允许更新,继续往下执行 false代表不允许更新,不会进行后续的操作
return false
}
|
点击强制更新按钮,打印结果不变:

但此时点击+1按钮:只会调用shouldComponentUpdate()钩子,不会调用其后的钩子。

父子组件间的生命周期函数
父子组件写法
1
2
3
4
5
6
7
8
9
10
11
12
13
14
15
16
17
18
19
20
21
22
23
24
25
26
| <script type="text/babel">
//创建类式组件
class A extends React.Component {
render() {
return (
<div>
<h2>我是A组件</h2>
{/*子组件B*/}
<B/>
</div>
)
}
}
class B extends React.Component {
render() {
return (
<div>
<h2>B组件,接收到的车:{this.props.carName}</h2>
</div>
)
}
}
//渲染组件到页面
ReactDOM.render(<A />, document.getElementById('test'))
</script>
|
再A组件也就是父组件给B组件也就是子组件传递新值的时候,会触发相应的钩子componentWillReceiveProps()
注意:第一次传递值不会触发钩子,新传递值才会触发
1
2
3
4
5
6
7
8
9
10
11
12
13
14
15
16
17
18
19
20
21
22
23
24
25
26
27
28
29
30
31
32
33
34
35
36
37
38
39
40
41
42
43
44
45
46
47
48
49
| <script type="text/babel">
//创建类式组件
class A extends React.Component {
state = { carName: '大奔' }
changeCarName = () => {
this.setState({ carName: '奥迪' })
}
render() {
return (
<div>
<h2>我是A组件</h2>
<button onClick={this.changeCarName}>换车</button>
{/*子组件B*/}
<B carName={this.state.carName}/>
</div>
)
}
}
class B extends React.Component {
//组件将要接收新的props的钩子 可以传递值
componentWillReceiveProps(props) {
console.log('B --- componentWillReceiveProps',props);
}
//控制组件更新的阀门
shouldComponentUpdate() {
console.log('Count --- shouldComponentUpdate');
return true
}
//组件将要更新的钩子
componentWillUpdate() {
console.log('Count --- componentillUpdate');
}
//组件更新完毕的钩子
componentDidUpdate() {
console.log('Count --- componentDidUpdate');
}
//初次渲染,状态更新时调用
render() {
return (
<div>
<h2>B组件,接收到的车:{this.props.carName}</h2>
</div>
)
}
}
//渲染组件到页面
ReactDOM.render(<A />, document.getElementById('test'))
</script>
|

可见第一次,不会触发。
当我点击换车修改状态并传递时:
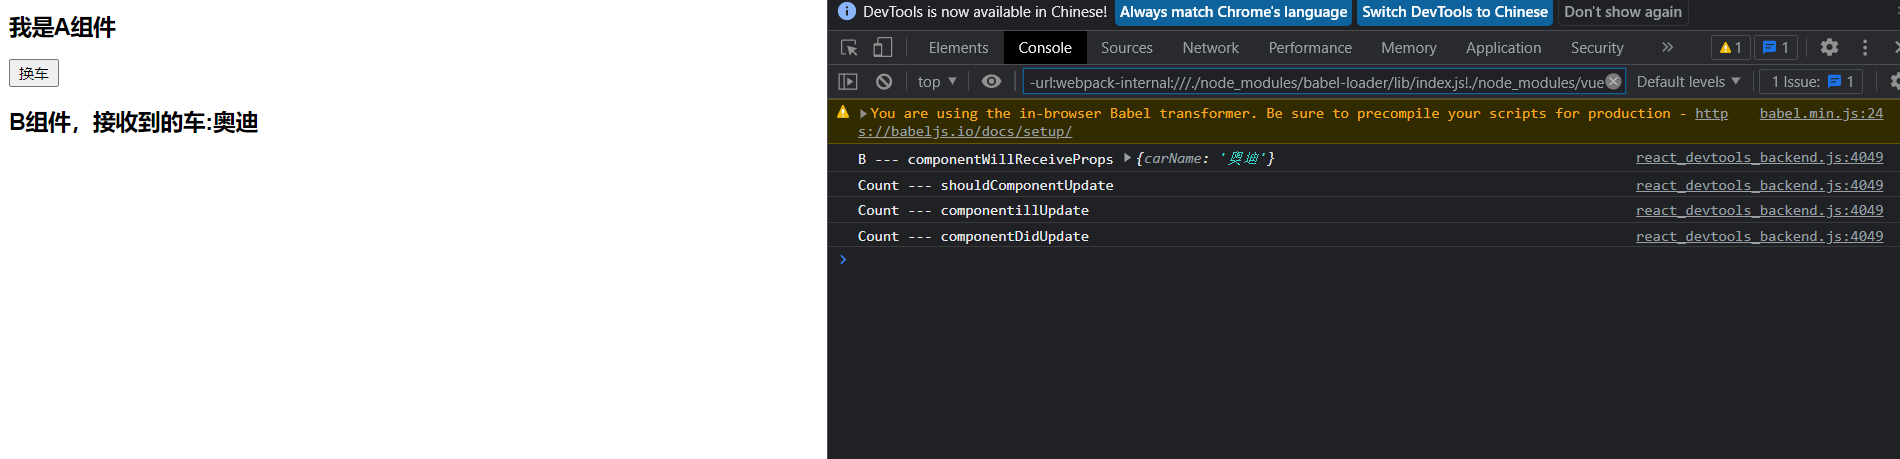
出发了相应的钩子,且更新时的钩子函数也被触发。
三、做个总结
初始化阶段
由ReactDOM.render()触发—初次渲染
constructor() —— 类组件中的构造函数
componentWillMount() —— 组件将要挂载 【即将废弃】
render() —— 挂载组件
componentDidMount() —— 组件挂载完成 比较常用
一般在这个钩子中做一些初始化的事,例如:开启定时器、发送网络请求、订阅消息
更新阶段
【第一种情况】父组件重新render触发
- componentWillReceiveProps() —— 接收属性参数(非首次)【即将废弃】
然后调用下面的钩子函数
【第二种情况】由组件内部this.setSate()
- shouldComponentUpdate() —— 组件是否应该被更新(默认返回true)
然后调用下面的钩子函数
【第三种情况】强制更新 forceUpdate()
- componentWillUpdate() ——组件将要更新 【即将废弃】
render() —— 组件更新
componentDidUpdate() —— 组件完成更新
卸载阶段
由ReactDOM.unmountComponentAtNode()触发
- componentWillUnmount()—— 组件即将卸载
一般在这个钩子函数里做一些收尾的事:关闭定时器,取消订阅消息
图示(旧的生命周期函数)
常用钩子:
- componentDidMount()
- componentWillUnmount()
即将废弃钩子:
- componentWillUpdate()
- componentWillReceiveProps()
- componentWillMount()